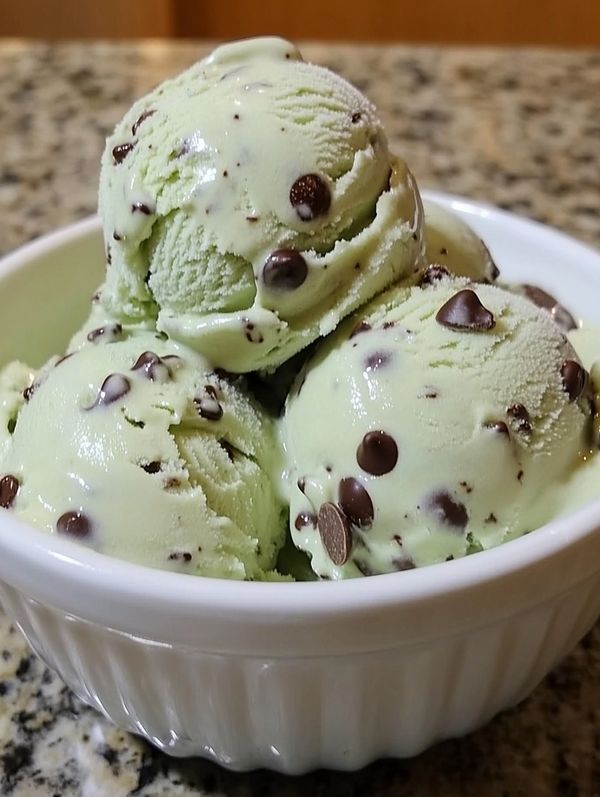
Imagine a scoop of vibrant green, refreshingly minty ice cream, studded with rich, dark chocolate chips, melting ever so slightly on your tongue. Now imagine that decadent treat is entirely dairy-free, made with wholesome ingredients, and crafted by your own hands. This isn't a dream – it's the reality of making your own easy homemade vegan mint chip ice cream. Say goodbye to store-bought versions filled with artificial ingredients and hello to a customizable, unbelievably creamy, and utterly delicious dessert that will become your new go-to.
Making vegan ice cream at home might sound daunting, but with the right ingredients and a few simple steps, you can achieve a superior texture and flavor that rivals any premium scoop shop. Our comprehensive guide will walk you through everything you need to know to create the ultimate vegan mint chip ice cream, from selecting the best plant-based base to achieving that perfect scoopable consistency and delightful minty burst.
Why Homemade Vegan Mint Chip Ice Cream is a Game Changer
There's an undeniable magic to homemade treats, and Discover the Delight of Dairy-Free Mint Chip Ice Cream for yourself by making it from scratch. Beyond the sheer satisfaction of creating something delicious, opting for homemade vegan mint chip ice cream offers a multitude of benefits that elevate it far above its commercial counterparts:
- Unparalleled Freshness: You control every ingredient, ensuring peak freshness and the absence of stale flavors or mysterious additives. This means a cleaner, brighter mint flavor and purer chocolate notes.
- Customization at Your Fingertips: Love a stronger mint? Add more extract. Prefer bigger chocolate chunks? Chop your favorite vegan bar. Want to experiment with a hint of coconut or a different sweetener? The power is yours. This level of personalization is simply impossible with pre-made options.
- Avoidance of Artificial Colors and Flavors: Many commercial mint chip ice creams rely on artificial green dyes and flavorings. When you make it at home, you can choose natural coloring agents (or embrace a naturally off-white tint) and pure peppermint extract for an authentic taste.
- Dietary Control: For those with allergies or sensitivities beyond dairy, homemade means you can select nut-free milks, soy-free chocolate, or specific sweeteners to fit any dietary requirement.
- Cost-Effective Indulgence: While initial ingredient costs might seem comparable to a premium pint, homemade yields a much larger quantity of high-quality ice cream for the price, making it an economical choice for regular indulgence.
- The Joy of Creation: There’s immense pleasure in whisking, blending, and churning your way to a luxurious dessert. It’s an edible act of self-care and a fun activity to share with family and friends.
Embracing the homemade route means you're not just making ice cream; you're crafting an experience that's healthier, more flavorful, and deeply satisfying.
Essential Ingredients for Your Perfect Vegan Mint Chip Ice Cream
The secret to incredible vegan mint chip ice cream lies in a thoughtful selection of ingredients. Each component plays a crucial role in achieving that creamy texture, vibrant flavor, and delightful crunch. Here’s what you’ll need to gather:
The Creamy Base
- Full-Fat Canned Coconut Milk/Cream: This is the superstar for richness. Use full-fat, unsweetened coconut milk (the kind in a can, not a carton). For an extra decadent base, you can opt for full-fat coconut cream, which is thicker and yields an even creamier result. Make sure to chill the cans overnight in the refrigerator; this allows the thick cream to separate from the watery liquid.
- Raw Cashews: Soaked cashews blend into an incredibly smooth, neutral-flavored cream that mimics dairy perfectly. They provide essential fat and body, contributing significantly to the ice cream's luxurious mouthfeel.
- Plant-Based Milk: A touch of unsweetened almond, soy, or oat milk helps achieve the right consistency for blending and churning without making the ice cream too heavy. Choose one that you enjoy the taste of.
The Sweetness and Flavor
- Maple Syrup or Agave Nectar: These liquid sweeteners are ideal for ice cream as they help keep the final product soft and scoopable, preventing it from becoming an icy block. You can adjust the quantity to your preferred level of sweetness.
- Pure Peppermint Extract: This is where the "mint" comes from! Opt for a high-quality pure peppermint extract for the best, most natural mint flavor. Start with a small amount and add more to taste, as potency can vary.
- Vanilla Extract: A splash of vanilla enhances the overall flavor profile, adding warmth and depth that complements the bright mint.
- Pinch of Salt: A tiny bit of salt balances the sweetness and brings out the other flavors, making them pop. Don't skip it!
The "Chip" Component
- Vegan Chocolate: Choose your favorite dark chocolate bar (ensure it's dairy-free) or vegan chocolate chips. For best results, use a chocolate with at least 70% cacao for a rich flavor that stands up to the mint. You can chop a bar into various sizes for different textures, from fine shards to chunky pieces.
Optional Natural Color
- Natural Green Food Coloring (e.g., Spinach Powder, Matcha, Spirulina): If you desire that classic vibrant green hue without artificial dyes, a small amount of spinach powder (which is virtually tasteless), matcha green tea powder (adds a slight earthy note), or spirulina powder can be used. Add very gradually until you reach your desired shade. Alternatively, embrace the natural, elegant off-white color of pure mint chocolate chip!
Pro Tip: Always taste your base mixture before churning! This is your last chance to adjust the sweetness or mint intensity to perfection. Remember that flavors can mellow slightly once frozen.
Step-by-Step Guide to Crafting Creamy Vegan Mint Chip Ice Cream
Get ready to turn simple ingredients into a spectacular frozen dessert. Follow these steps for the perfect batch of easy homemade vegan mint chip ice cream.
1. Preparation is Key
- Chill Coconut Milk: Place your cans of full-fat coconut milk (or cream) in the refrigerator overnight, or for at least 8 hours. This allows the thick cream to separate from the liquid.
- Soak Cashews: For ultra-smoothness, soak raw cashews in hot water for at least 30 minutes, or in room temperature water for 2-4 hours, or even overnight in the fridge. Drain and rinse thoroughly before use.
- Pre-Chill Ice Cream Maker: If using an ice cream maker with a freezer bowl, ensure the bowl is completely frozen (usually 12-24 hours) according to manufacturer instructions. This is crucial for successful churning.
2. Blending the Base
- Open the chilled coconut milk cans without shaking. Scoop out only the thick, solid cream from the top, leaving the clear liquid behind (you can save this liquid for smoothies or other recipes).
- Combine the coconut cream, soaked and drained cashews, plant-based milk, maple syrup (or agave), pure peppermint extract, vanilla extract, and pinch of salt in a high-speed blender.
- Blend on high until the mixture is completely smooth and creamy. There should be no grainy cashew bits visible. This may take 2-4 minutes, depending on your blender. Scrape down the sides as needed.
- Taste the base and adjust sweetness or mint extract if desired. Remember that the flavors will be slightly muted when frozen, so it can be a little stronger than you think it needs to be.
3. Adding the Minty Freshness and Color (Optional)
- If you're using natural food coloring, add it now. Start with a tiny amount (e.g., ¼ teaspoon spinach powder or spirulina) and blend briefly. Gradually add more until you achieve your desired shade of green. You can also skip this step entirely for a naturally light-colored mint chip.
4. Churning to Perfection
- Pour the blended ice cream base into your pre-chilled ice cream maker bowl.
- Churn according to your machine's instructions, typically for 20-30 minutes, or until the mixture reaches the consistency of soft-serve ice cream. It should be thick but still pliable.
- No-Churn Alternative (Briefly): If you don't have an ice cream maker, pour the base into a shallow, freezer-safe container. Freeze for 1-2 hours, then remove and stir vigorously to break up ice crystals. Repeat this every 30-60 minutes for 3-4 hours, or until desired consistency is reached. This method results in a slightly icier texture but is still delicious.
5. Incorporating the Chocolate Chips
- When the ice cream has reached the soft-serve stage in your machine (usually in the last 5 minutes of churning), add your chopped vegan chocolate or chocolate chips directly into the churner. Let it mix for another 1-2 minutes to evenly distribute the chips.
- If adding manually, transfer the soft-serve ice cream to a large bowl and gently fold in the chocolate chips with a spatula.
6. Freezing for Scoopable Bliss
- Transfer the churned vegan mint chip ice cream into an airtight, freezer-safe container. Press a piece of parchment paper or plastic wrap directly onto the surface of the ice cream to prevent ice crystals from forming.
- Freeze for at least 4-6 hours, or preferably overnight, until firm enough to scoop.
- Before serving, let the container sit at room temperature for 5-15 minutes (depending on how hard it's frozen) to soften slightly for easier scooping.
Tips and Tricks for the Ultimate Vegan Mint Chip Ice Cream Experience
Mastering homemade vegan mint chip ice cream is an art, and these insider tips will help you perfect your craft, ensuring every scoop is a delight.
- Quality of Peppermint Extract Matters: Just like with vanilla, a high-quality pure peppermint extract makes all the difference. Avoid artificial extracts if you can, as they can sometimes leave a candy-like or chemical aftertaste. Taste and adjust; it's easier to add more than to take away.
- Don't Skimp on the Fat: The full-fat coconut milk/cream and cashews are essential for achieving that rich, creamy texture without dairy. Using light coconut milk or reducing the cashews will result in a much icier, less satisfying ice cream.
- Chill Everything: Ensure your ice cream maker bowl is thoroughly frozen, and your base mixture is as cold as possible before churning. A colder starting temperature means less churning time and finer ice crystals, leading to a smoother texture.
- Chocolate Choice: Experiment with different types of vegan chocolate. A good quality dark chocolate (70%+) provides a lovely contrast to the mint. You can also use a mixture of finely chopped chocolate for a melt-in-your-mouth experience and larger chunks for a satisfying bite. Consider grating some chocolate into the mix for tiny "shavings."
- Preventing Hard Ice Cream: Liquid sweeteners like maple syrup and agave help keep the ice cream softer. Don't over-freeze it. If it becomes rock-hard, let it sit out for 15-20 minutes before attempting to scoop.
- Airtight Storage is Key: To prevent freezer burn and the formation of large ice crystals, always store your homemade vegan mint chip ice cream in an airtight container with a piece of parchment paper or plastic wrap pressed directly onto the surface. This creates a barrier against air. It will keep well in the freezer for up to 2-3 weeks, though its texture is best in the first week.
- Serving Suggestions: Enjoy your fresh mint chip ice cream in a crispy waffle cone, alongside a warm vegan brownie, or topped with a dollop of coconut whipped cream and an extra drizzle of melted chocolate.
- Homemade vs. Store-Bought: While there are many fantastic commercial vegan ice cream brands available, making your own truly allows for unparalleled freshness and flavor customization. For a deeper dive, check out our comparison: Vegan Mint Chip Ice Cream: Brands vs. Homemade Taste-Off. You'll likely find that homemade wins on many fronts!
With these tips, you're well on your way to becoming a vegan ice cream connoisseur, delighting yourself and your guests with every perfect scoop.
Making your own easy homemade vegan mint chip ice cream is a rewarding experience that offers superior flavor, customizable ingredients, and immense satisfaction. From the creamy plant-based base to the refreshing burst of peppermint and the rich chocolate chips, every element comes together to create a truly irresistible dessert. So, gather your ingredients, fire up your blender, and get ready to churn your way to a delightful, dairy-free treat that will quickly become a beloved staple in your home freezer. Enjoy the process, savor the flavor, and delight in the knowledge that you've created something truly special.
